I take my road trips and vacations pretty seriously. I research where to go well in advance, and use various sources to exhaustively catalogue all the places I may want to visit, and all the things I may want to do. I’ll often look into interesting restaurants I may want to eat at. Even for a modest trip this may end up being a huge amount of information, and it requires some sort of system of organization to keep it uncluttered and useful.
Over the last several years I have been trying different tools, and trying different systems. I think I have finally honed a system that works very well, at least for me and my mindset. This system uses two separate documents: a spreadsheet to compile an itinerary, and a custom Google map to plot physical locations including hotels, restaurants, and any other places I may want to visit. The spreadsheet itinerary may not even be necessary, depending on your trip. For instance, if you are flying or driving somewhere and staying at the same place for the duration of your trip the itinerary may not be too useful. Its utility really becomes evident for those multiple day road trips where the overnight location changes every day, or every other day or so.
In this post I will describe each of these documents in depth, and explain how and why I use them to plan my trips in general, using my current planned trip as example.
The Google Sheets Itinerary
I should preface this by saying you don’t have to use Google Sheets. Any spreadsheet app like MS Excel or OpenOffice Calc will do the job, but I use Sheets as it is web-based and allows me to keep the document organized logically with my maps in a common folder on my Google Drive cloud storage, and it keeps the document accessible to any device.
Now, I am assuming you have already figured out, roughly at least, where you will be travelling to, and the general area (towns or cities at least) where you intend to overnight each night. So open up your spreadsheet app and create a new file. In Sheets you would do this by navigating to your Google Drive, then click on “+ New“, then “Google Sheets“.
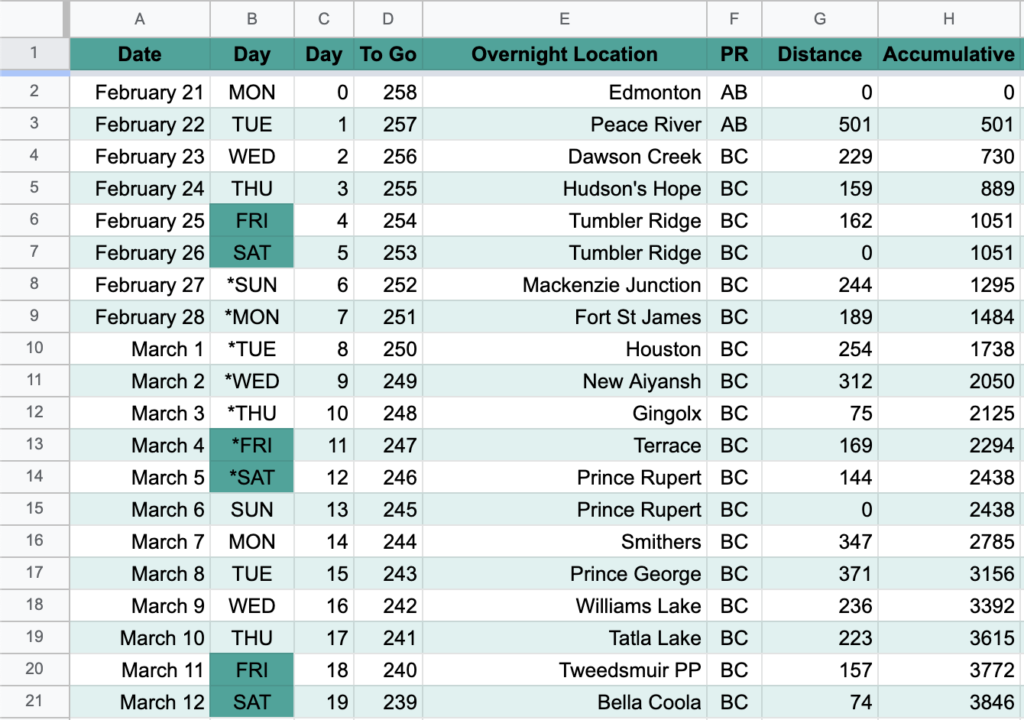
You are of course able to organize the itinerary in the way that makes the most sense to you, but the way I like to do it is from left to right label the top row in each column: Date, Day, Overnight Location, Distance, and Accumulative. These are all fairly straightforward. Begin populating your cells with the pertinent info. I like to highlight Fridays and Saturdays in my Day column, as sometimes weekends can have ramifications on the price and availability of accommodations and attractions at busy and popular locations. For overnight location I just put in the town, city or whatever geographic locality I intend to overnight in. Don’t worry about specific hotels or whatever just yet. Distance contains the point-to-point driving distance between overnight locations as computed by Google Maps. If you intend to take backroads or otherwise go the ‘scenic route’ make sure you specify this in Maps so the figure is somewhat accurate. Accumulative contains just what it suggests: the accumulative distance you will be travelling as each day transpires in your trip. This is useful as it will give you a rough idea how much fuel your vehicle will consume over the trip, or where you will want to look for charging stations if you have an electric vehicle.
It is beyond the scope of this post to explain, but if your spreadsheet-fu is pretty good you can find shortcuts to populate repetitive entries such as the date and day, and you can use functions to automate the computation of accumulative mileage and so forth. If you are not too sure what I am going on about here you may want to read or watch a tutorial on how to use your chosen spreadsheet software, then come back to this one.
As you can see from the picture of my itinerary above, I have some additional columns that hold information that is important and or useful for my specific circumstance. Don’t sweat it too much for now. Everyone is different, and you will just have to learn through experience what information works best for yourself. I have also applied some cosmetic features, such as pinning the top row so the headings are always visible as I scroll the document, and shading every other row for legibility. These are particularly useful for extended trips such as mine. Again, it’s your trip, and your plan, so put as much or as little work into customizing it to your circumstances as you wish.
So if your trip is fairly short and basic you may already be done here. I like to add a few more columns however, to really keep all the important details in one place. For example, I have added four more columns directly to the right of my example above: OdoStart, OdoEnd, Actual, and AcctualAccum. These columns are empty for now, but as I embark on the trip I will note my actual odometer readings and input them at the end of each day. This information may or may not be important to you.
That’s not it though. There is much more information we can add to help us plan, and make things go smoothly. Please regard the following image:
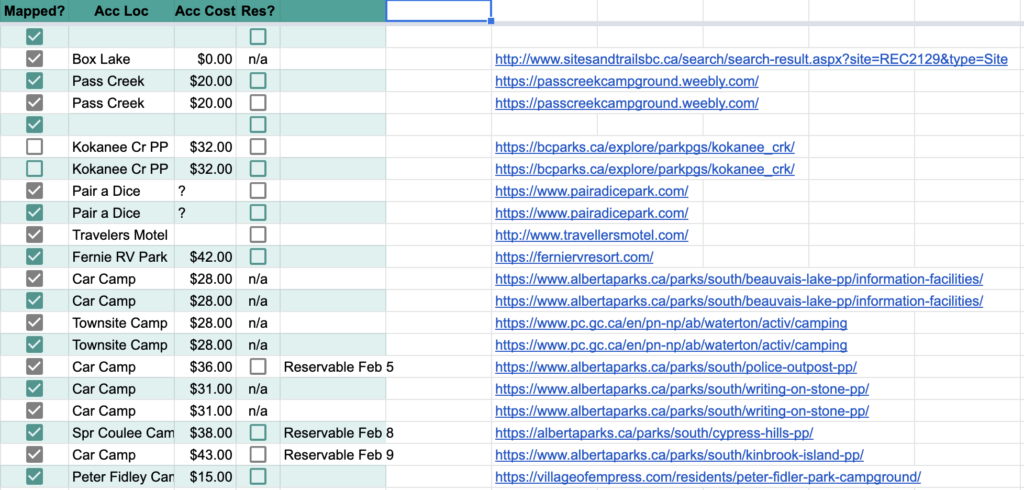
So first I have a column titled Mapped? which just contains a simple checkbox. This is simply to tell me if I have completed mapping my trip for that particular day, ie: completed the mapping part we have not yet gotten to. I think most people won’t need this, but it helps me to see what I need to work on for a ~260 day trip. Next is Acc Loc and Acc Cost, which is the specific accommodation I will be staying at, and the nightly cost for it. In this case, it is a mix of private and Provincial Park campgrounds. To the right of that is Res?, another column of simple checkboxes (or n/a) which tells me whether or not I have secured a reservation yet. Since it is still a bit early, and most Provincial Park campgrounds are not yet open for reservations none of these are checked yet. In another column I have written in the date at which each campground opens for reservations, as it is not always the same time depending on the park and the Province in question. I have also added these dates to my calendar and set a notification to alert me the day before so I don’t forget and miss out on reserving a particularly popular spot. And finally, I have placed a link to the website of each place I am staying at on the far right out of the way. This is just for easy reference. You may be thinking columns for the address of each place or phone number might be useful information to add here. If you want to that is just fine, but I don’t bother as each place will be plotted on the Google Map in the next step, as well as all the associated contact details that Google knows about, so I don’t bother with the redundancy.
So that’s pretty much it for the spreadsheet itinerary. There may be more or less information that you want to add or omit depending on your particular trip. Generally, it’s a good place to note anything that is going to change or would help to track on a day to day basis. For example, on my trip I have noted with an asterix the week surrounding new moons, and noted with exclamation marks the week surrounding full moons. As photography is important to me, I want to be able to see at a glance which days will have dark sky suitable for astrophotography, and conversely, which days will be bad for it, but perhaps better for nightscape photography, as the full moon will light up the landscape more than usual. As you can see, using a small punctuation mark in the Day column adds a lot of useful information using very little space:
The Google Mymaps Maps
So now we arrive at the meat and potatoes of trip planning: the map!
If you are not familiar with custom Google Maps there are two ways to start a new one:
1. Open Google Maps, and click on the three bars (top left) to display the menu. Click on Your Places, then Maps, then click CREATE MAP at the bottom. Or…
2. From your Google Drive click on + New, navigate to More, then click on Google My Maps.
In any case, you should see something like this:
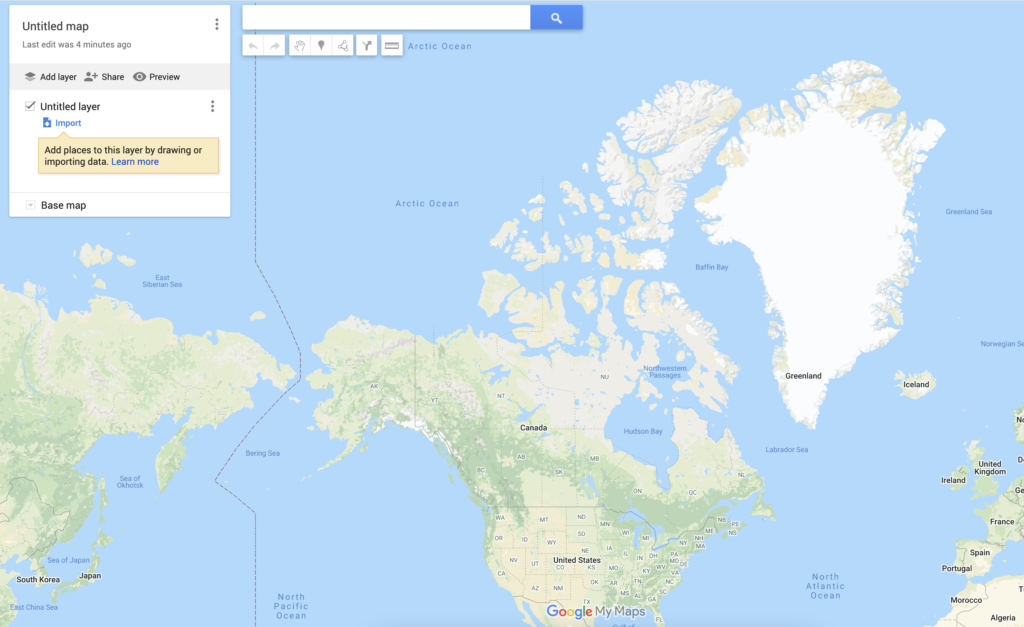
This is probably a good time to give it a meaningful title. Now we should spend a bit of time talking about layers. You may already be familiar with the concept from Photoshop. Basically, a layer is a ‘slice’ of the map wherein you can plot arbitrary information that is logically related. The value of layers is that the visibility of the information can be toggled on and off. It should be noted that Google My Maps currently only supports 10 layers, but I have not yet found this to be a practical issue. Layer visibility can be toggled by clicking on the checkbox just left of the layer name.
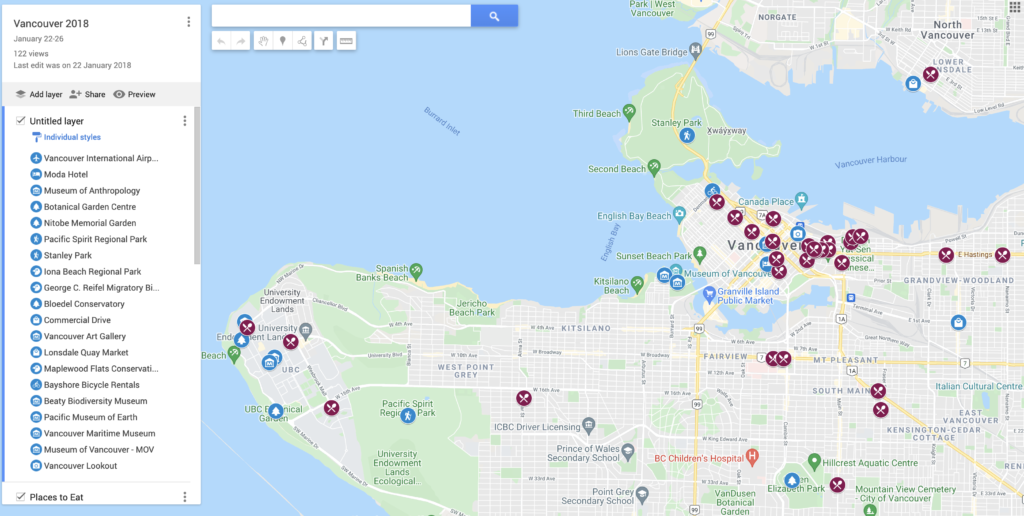
So before you get started you will want to give some thought to how you want to organize your map. For a simple road trip you might want to make a layer for overnight locations, one for restaurants you want to try, and one for attractions you want to visit. Perhaps you want to be more discrete and differentiate between photo opportunities, hiking trails, and museums. If you are on a reasonably short trip it may make more sense to put all stops for each day in a seperate layer. The choice is completely up to you, and your trip. Despite the length and complexity of my trip I am using only three layers so far. One for overnight locations, one for historic buildings and photo ops, and one for hiking and birding spots. Now the distinction between the last two is somewhat arbitrary. Basically, I wanted to differentiate between places that will only warrant a quick stop and look-see versus places that will require spending a significant amount of time and walking.
Let’s start by adding overnight locations to the default layer that is already created. Begin by giving it a useful title, like ‘overnight locations’ or similar. Click the three dots on the right, and choose Rename this layer. Now to add places. Don’t forget to start with where you live, or where your trip starts. In the search box type in your town, or if you like you can put in your exact address. The map will zoom and center on the location you searched for. You should see something like this:
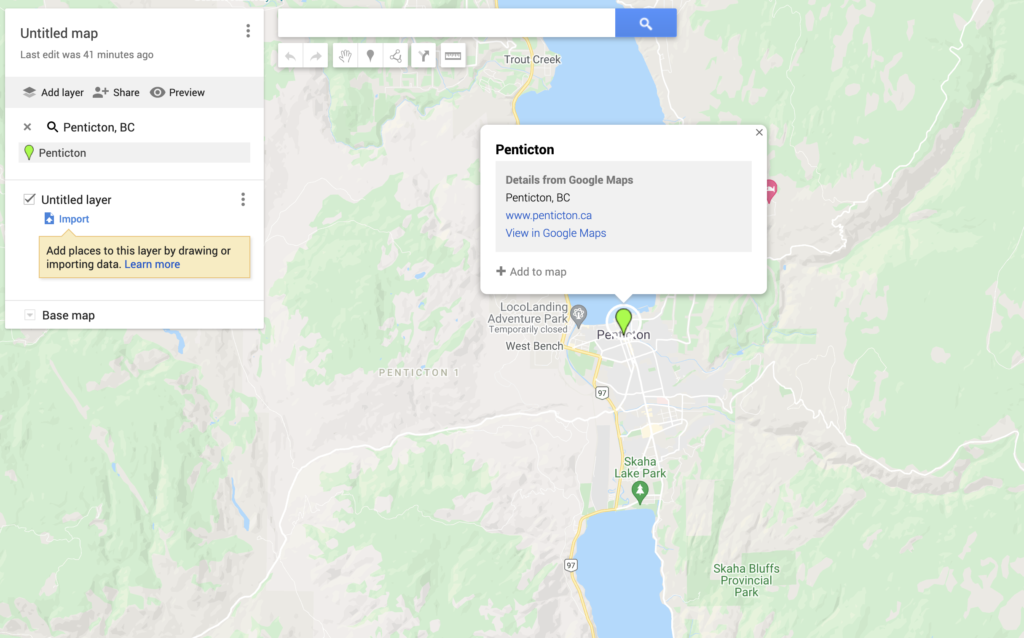
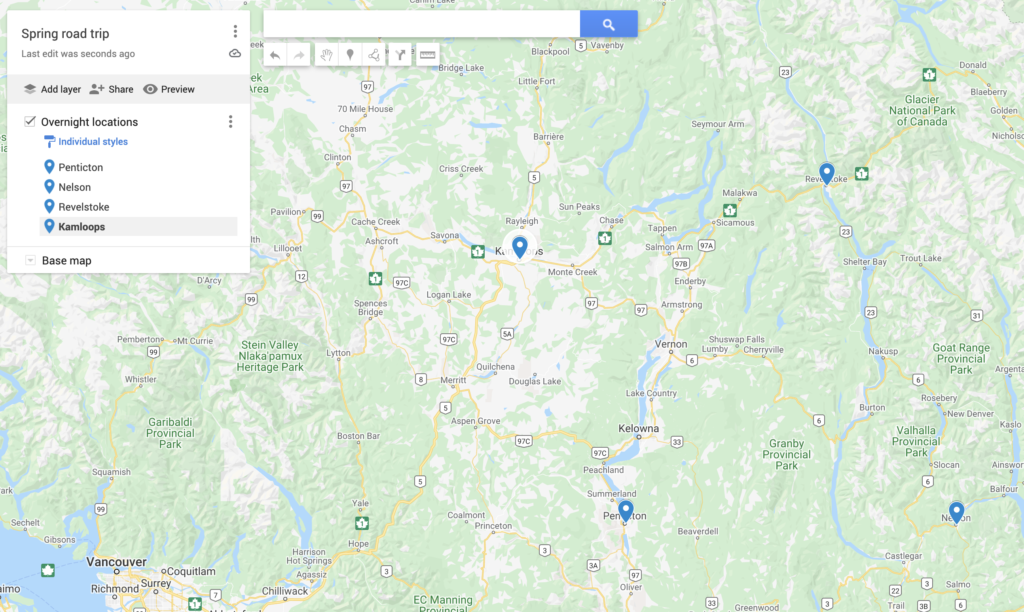
Click on Add to map and the pin will turn from green to blue and it will be listed on the left under the layer heading. Continue this process until all your overnight locations have been added. You don’t necessarily have to do it in order, but it is far more pleasing to do so for folks with mild OCD such as myself. It should be noted that you can drag and drop to re-order the pins in the layer list on the left. After adding all your overnight locations your map should look something like this:
Now let’s add another layer and start adding some spots to visit. Simply click on Add layer and another unnamed layer will be created below the first. Let’s say we want to add some scenic viewpoints. We already know about searching for locations using the search bar, but we can also add any feature that we can see on the map itself. Whilst searching the Osoyoos area I can see a pin for the Anarchist Mountain Lookout. Clicking on the pin will pop-up the description, and once again it will say Add to map at the bottom. Clicking on this will add the pin to whichever layer you are currently working with.
There may be places you wish to add that google doesn’t know about, either because they have not yet been added, or perhaps because the places are private or otherwise unknown. You can add these as well. There are some icons directly below the search bar. By default you are in ‘hand mode’, which allows you to reposition the map by dragging on it. If you hover over the pin it will say Add marker. Click on this and the hand will turn into a crosshair. Click on your secret location on the map and it will pop up with a default name of ‘Point 2’ or similar. Give the pin a proper name and a description if you wish, then click Save and it will be added beneath all your other pins in the active layer.
Customizing the pin icons and colours
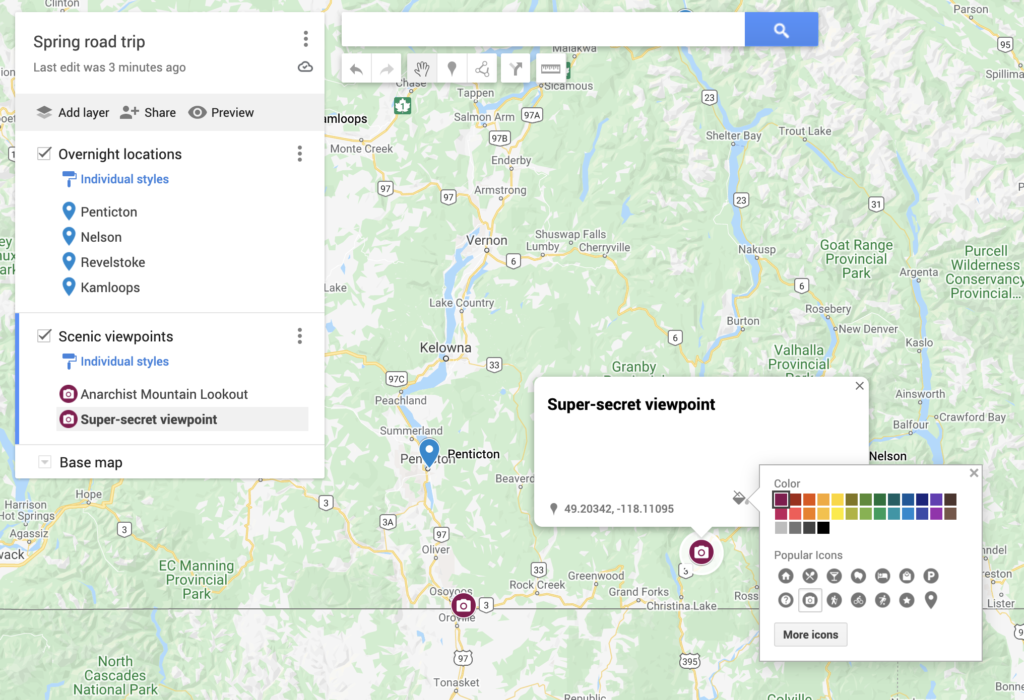
To really make you pins visually distinctive you can customize their look. From the pin-list on the left you can hover over and click the paint bucket which appears, or click on the pin on the map and click on the paint bucket icon at the bottom. There will be 30 colours from which you can choose, and also a set of 14 ‘popular icons’. If you don’t see anything you like there click on More icons and there is hundreds to choose from. I decided to change the viewpoints to purple with a camera icon, as you can see in this example image:
So that’s really about it. Just keep plugging away and adding all the physical locations that are important to you and your trip into the relevant layer until you have them all. Note that if you add a pin to the wrong layer you can drag and drop it to the correct one. You can also add arbitrary text or pictures to your pins, just click on the pen or camera icon at the bottom. It is very intuitive so I will leave it for you to discover. If you add a pin by mistake just click on the trashcan to delete it.
Turn by turn directions
It should be noted that you can add Google Maps turn by turn directions directly to your custom map. I do not use these personally, as I generally either know the way already, or like to wander aimlessly from point to point. The only time I use directions is if I have arrived at an unfamiliar city, and just want to b-line to my hotel or whatever, and in this case there is no benefit to cluttering up the custom map, I just use regular Google Maps directions.
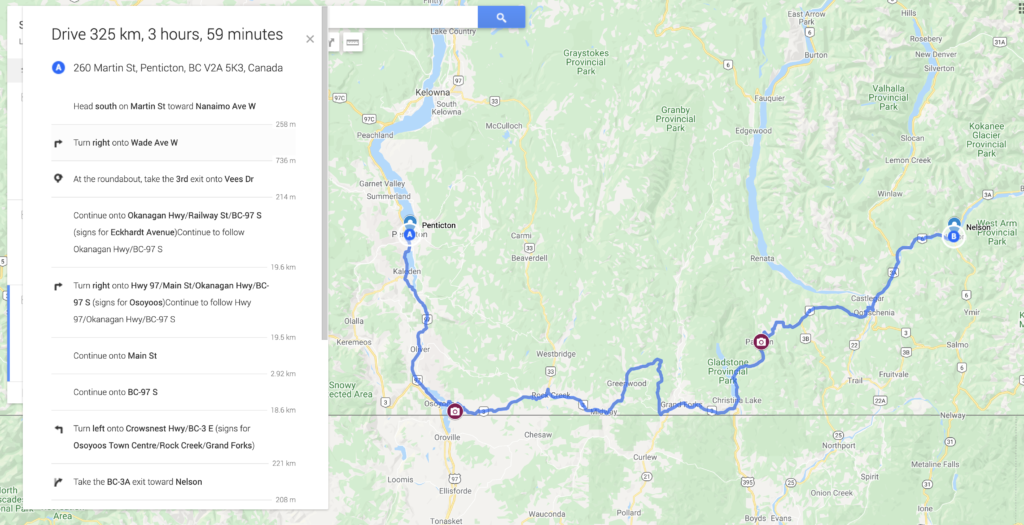
That said, I will describe it a bit here as it may be useful to others. The first thing to know is that adding directions uses up one of the layers. To get started, you can either click on one of your destination pins then click on the ‘bendy arrow’ (Add directions) icon, or you can click on the icon below the search bar and add them that way. Either way, a new layer for the directions will be created, and you can add as many as 10 stops. If you need more than this you will have to split the directions up into two separate layers. As you add stops Google will highlight the road to take on the map. By default Google will add the shortest and most direct route, but you can use the ‘hand’ tool and drag the route to another road if you want to take the scenic route.
If you click on the three dots and choose Step-by-step-directions a box will pop up and give you all your turns:
So if you have saved these documents to you Google Drive, they will be available to any and all devices you may want to use whilst on the road. Please note that you may have to install Google Sheets and Google My Maps onto your phone or tablets as they may not be installed by default. Both apps are available from the Google Play store for free.
I should also note that the above maps are all in ‘editing mode’. There is also a ‘read only’ mode which you can see by clicking on Preview on the left menu. Honestly, I think the read-only maps are a bit clunkier, and just prefer to work from the edit mode version. Use the one that you prefer best. You are also able to share these maps with friends and family, so they know where you are going. It’s also a very good idea to leave a copy of your itinerary with a loved one or family member, so someone knows where you are and when you will be there.
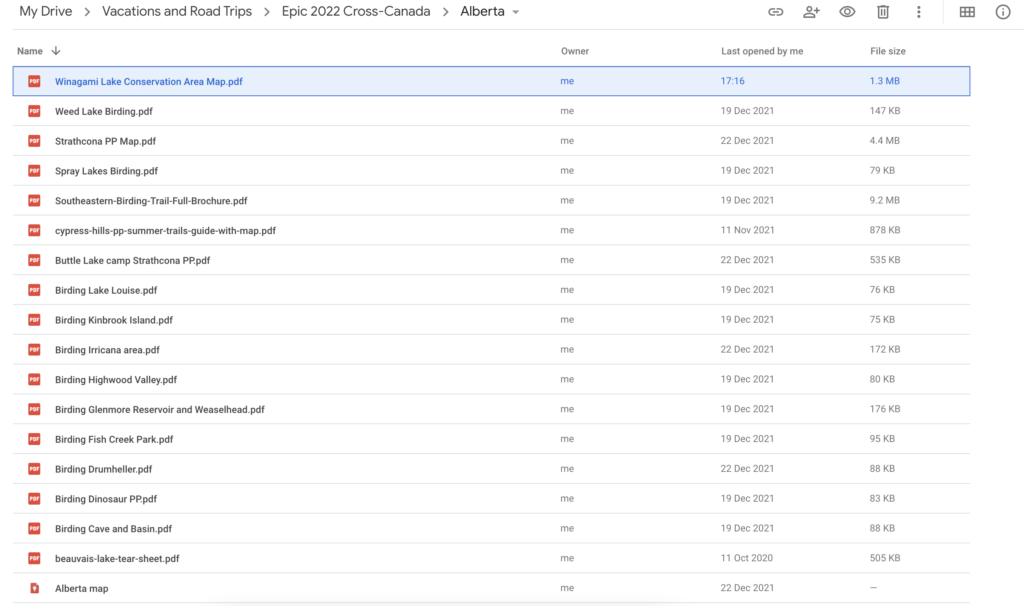
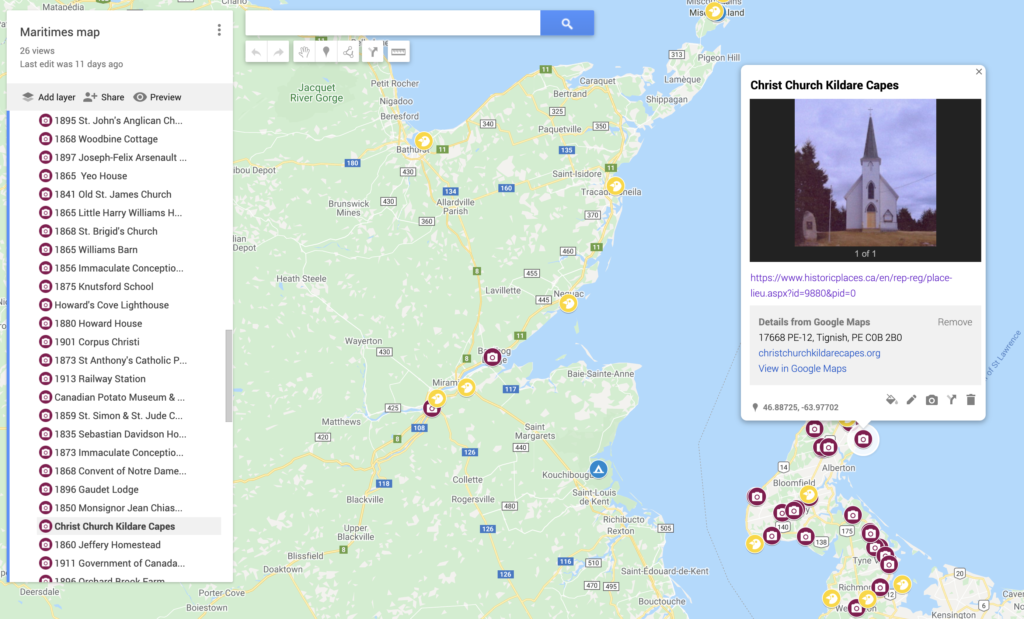
A single map is almost certainly fine for most trips, but you may want to think about more nuanced organization for longer trips, both to keep you maps less visually cluttered, and also to keep from adding so many points to the map that it becomes sluggish and unresponsive. For my trip I decided to make one map for each Province, except for the maritime provinces which I combined into one. This also allows for some nuanced organization when it comes to my Google Drive where I keep everything.
I have a top-level directory titled “Epic 2022 Cross-Canada” which contains the spreadsheet itinerary. It also contains one subdirectory for each province which contains the map file itself, and also ancillary documentation. This includes park maps put out by regional or provincial park organizations, localized field guides and birding guides, and any other sort of reference I have found during my trip planning that I wish to easily find for future reference. I use an ‘Upload to Google Drive’ Chrome extension which makes uploading and collecting this material trivial.
This is not specific to either of the two documents above, but I often get asked how I research and find all the places I want to stop at so I thought I would write a bit about that. The truth is, I check and cross-reference a great many sources, both online, and dead-tree. I do not purchase dead-tree travel guides, such as those published by Fodors or Lonely Planet, but I am a big fan of local and hyper-local guides to road trips for my area of interest. These can generally be found on Amazon by searching for ‘road trip’ + the geographic area you are interested in or similar. I also own a great many ‘backroads touring’ books for various regions of British Columbia and elsewhere. These guides are fantastic for revealing truly off the beaten path gems. I am also a big fan of the Backroads Mapbooks series of map books which contain both detailed topo maps and listings of every back road attraction, fishing lake, hiking trail, waterfall, wildlife preserve and much much more for the area it covers. At this point I’ve basically bought the entire series which covers pretty much all of Canada south of the 60th parallel.
The vast majority of my research, however, is accomplished using free online tools, and there is no reason you could not use exclusively online tools to save on money and trees. Exactly where you look depends largely on what you are interested in. Generally, simply querying Google with the formula “best thing in geographic area” will result in hundreds of results to sort through. For example, typing ‘best waterfalls in the rocky mountains’ into Google will return many top-10 lists and similar put together by travel bloggers and other content creators. Searching “best places to eat in Montreal” will return all sorts of foodie recommendations. Searching “best places to bird in central Saskatchewan” will return guides to all the best local patches.
There are also specific sites for specific interests. For example, if hiking is your jam, then AllTrails is the site for you to check out. If you like shooting historic buildings like me then the advanced search at HistoricPlaces.ca will reveal everything worth seeing within the geographic area you are visiting. If you want to visit all the ‘biggest perogy on a fork’ type places along your route you will find them all compiled at the Roadside Attractions website.
It’s also not a bad idea to reach out on social media to some locals, both those you know and those you don’t. Most folks will be happy to share all the best kept secret local attractions.
Conclusion
It is not that difficult to use a couple of free tools to organize your trips and vacations, from the simplest to the most complex to ensure they go off as worry free as possible. I’d love to hear you thoughts about this post, and I hope you let me know if you decide to use any and all of the tips I’ve provided here. Please feel free to drop a comment below, or send off an email.
Thanks for coming along for the trip!
This is just amazing. I could never be that organized. I am looking forward to following your trip!
Thanks Cheryl!